How To Suggest Meeting Time Slots via the Chrome Extension
For users of the Email Sidebar on:
9 min read
RG Email Sidebar enables you to schedule meetings with your business contacts without any extra back-and-forth email correspondence. Select available time slots in your calendar, also considering availability of your colleagues involved, create and send out interactive meeting invites, get your calendar automatically updated according to the recipient’s time choice. Additionally, RG Email Sidebar adds Events created this way to your Salesforce account.
Tip
Also, see this Revenue Grid blog article for special insights
On link opening, selected Time Slots are parsed as a “static shot” that does not exclude suggested slots which got reserved after the link was opened.
However, any reservations added to the Organizer’s calendar later are also considered by the Time Slots system. As soon as a recipient clicks on their preferred slot, RG Email Sidebar checks if the slot is still available in the organizer’s calendar. In case it is occupied by another reservation, the recipient is suggested to pick another slot. In addition, by refreshing booking page browser window, the recipient can actualize the table after such checks.
Time Slots links can be generated even if RGES Sync Engine is not running; however, in this case, the resulting meetings cannot be synced in the Salesforce calendar till syncing is resumed.
Tip
See this article to learn how to use the Time Slots feature in RGES Outlook Add-in
Time Slots links generation steps
To schedule a meeting via the via RGES Meeting Scheduler by sharing your preferred time slots through an interactive invitation:
1. Open an email from/to recipient(s) who you want to initiate a meeting with or create a new email message by clicking the New email or the Reply button in Gmail and specify one or multiple recipients in the To, Cc, or BCC fields. Then open the RG Email Sidebar by clicking the Open RG Email Sidebar icon
\open-ts.png)
2. In RG Email Sidebar, click the Time slots icon in the Smart actions bottom toolbar
Once you click the Time Slots icon, you will see the following Time Slots dialog in the sidebar:
\ts-full.png)
>>> Click to view details <<<
1. Action buttons Cancel and Next:
- Click Cancel to cancel the link creation and leave the Time Slots dialog
- Click Next to proceed with the next Time Slots dialog where you will select the time slots available for booking
2. The subject of the meeting. RGES prefills it with the email subject, but you can modify it
3. The location where the meeting will be held (meeting room, online, etc.)
4. The duration of slots for the meeting. You can preset the meeting duration varying from 15 minutes to 8 hours
5. The required attendees are prefilled with the email recipients. If the in-org attendees are added to this field, RGES analyzes their and the organizer's calendar data and shows only the slots that are available for all meeting participants. The internal in-org attendees added to this field will receive the invite for this meeting once the link recipient books it. More information here
6. The optional attendees who will receive the invite for this meeting once the link recipient books it. It's prefilled with CC email recipients
7. Business record in Salesforce (Account, Opportunity, Case, etc.), which will be linked with the resulting Salesforce event once the link recipient books a meeting
8. People record in Salesforce (Lead, Contact, Person Account, etc.), which will be linked with the resulting Salesforce event once the link recipient books a meeting
9. The meeting reminder. Select this checkbox to create a reminder about this meeting
10. The Slots in drop-down list allows selecting different time zones for time slots if required
11. The Body field. Here you can add the meeting description, notes, and other related information
First Time Slots dialog
Fill in the general meeting parameters
3. Fill in the basic meeting details in the first Time Slots dialog:
\ts-general.png)
-
The Meeting subject field is prefilled with the subject of the related email (if any), and you can edit it according to your needs
-
In the Location field, you can select a room or location from your Google workspace or manually enter a location (including online services)
-
In the Duration drop-down list, you can set the meeting slot duration from 15 minutes up to 8 hours
-
In the Attendees (required) field, you can add the participants whose presence is required at the meeting. It’s prefilled with the email recipients. Also, you can add internal attendees who will receive the invite for this meeting once the link recipient books it
Note
If you add any in-org attendees (they must belong to your Google workspace) in the Attendees (required) field, the resulting Booking page will show only the time slots that are available on all in-org attendees and organizer’s calendars. This ensures that the selected slot will be convenient and available for all required in-org attendees
- In the Attendees (optional) field, you can add the participants, who will also receive the invite for this meeting once the link recipient books it, but as optional attendees. Note that optional attendees’ calendars are disregarded on building availability table
\description.png)
- In the Body (Description) field (at the bottom of the Time Slots dialog), you can add additional information for participants, which will be saved as a meeting description in the Google calendar and in Salesforce. Note that the generated email will not include this text in its body
Link the meeting with Salesforce records
4. Link the meeting with the Salesforce Business and People records:
\bookme-linked.png)
-
In the Save to Salesforce record search box, you can find and select a Business record (Account, Opportunity etc.), which will be linked with the resulting Salesforce event once the link recipient books a meeting
-
In the Save to Lead or Contact search box, you can find and select a People record, which will be linked with the resulting Salesforce event once the link recipient books a meeting
Note
If you faced a situation when the booked meeting had linked to the wrong Contact in Salesforce, refer to this article describing how to resolve the problem and prevent it in the future
Fill in the advanced meeting parameters
Tip
\ts-collapse.gif)
5. Fill in the optional meeting details under the Advanced options tab:
\ts-advanced.png)
-
Using the Reminder field, you can enable and set a Google reminder in your Google calendar to notify you before the meeting starts
-
Using the Slots in drop-down list, you can set the custom time zone for the meeting time slots.
For example, if your recipient is located in a different time zone. Also, you can quickly find the needed time zone using the search field
\ts-next.png)
6. After populating all required fields in the first Time Slots dialog, click Next to proceed with the second one
Second Time Slots dialog
Select preferred time slots for the meeting
In the second Time Slots dialog, RG Email Sidebar reads your Google calendar data and build daily tables of your unoccupied time slots, so you can easily find available time slots and select the preferred ones. Also, if you added any of your colleagues in the Attendees (required) field, these tables consider your colleagues’ calendar data and show only the time slots that are available for all in-org attendees.
\ts-selector.gif)
7. Select the preferred time slots within the unoccupied spans in the schedule:
-
Open the preferred date by clicking the Date selector at the top of the dialog; you can also navigate between days by clicking the arrow icons on either side of the selector
-
Pick meeting time spans that suit you best by clicking on a free slot and dragging the cursor down; selected time spans can be longer than the meeting Duration specified in the previous dialog but cannot be shorter
Note
If you select several adjacent time slots, they do not get merged, and displayed as separate time slots on the Booking page
Tip
Note that you can select multiple time slots on different dates: after you have selected slots on one date and then switch to another date using the calendar control at the top, all previously selected slots are kept
Generate and insert Time Slots links
\ts-insert.png)
8. Click Insert in the upper right corner of the second dialog, and the generated Time Slots links will be automatically inserted into the new email message
Now you can send the email containing the Time Slots links out to the recipient, so they can select a convenient time slot and book a meeting with you.
Important
The Time Slot links are valid for 60 days after they were generated or till the date of the latest proposed slot, whichever comes first. Also, Time Slots links expire once the recipient books the meeting. The 60 days validity period can be adjusted on a request sent to our CSM team
Tip
If you want to set up a custom Time slots email message template, refer to this article
Automatic Parsing of In-Org Mandatory Attendees’ Availability
If any of the meeting’s required attendees are your colleagues (their email addresses are recognized as internal), RG Email Sidebar considers their calendar data and reflects it on a schedule in the second Time Slots dialog along with yours. This feature allows you to select time slots suiting your colleagues’ calendars:
\ts-colleagues.png)
Note that you cannot select time slots within day-long spans reserved for all-day calendar events with busy and out of office statuses. However, free and tentative (non-mandatory) all-day events do not impose this limitation and are not indicated in the Time Slots calendar. The same handling patterns are also applied for non-all-day meetings and appointments.
Time Slots Dialog Auto-Filling
In the Time Slots dialog, RG Email Sidebar prefills some fields with the default values, the data from the selected email (if any), and your Google account. The following fields will be prefilled:
-
Meeting subject – the subject of the selected or opened email when the Time Slots icon is clicked in the Sidebar
-
Duration – 30 minutes
-
Attendees (required) – recipients from the To field of the selected or opened email when the Time Slots icon is clicked
-
Attendees (optional) – recipients from the CC field of the selected or opened email when the Time Slots icon is clicked
-
Reminder – None
-
Slots in – time zone specified in your mail account settings
Also, there is a possibility to set custom values that would be prefilled every time you open the Time Slots dialog in RG Email Sidebar. To get this option configured, please send a corresponding request to our Support team.
How to Select a Time Slot (Recipient Side)
Note
The Booking page language is set based on the locale specified in the web browser of the Time Slots links recipient
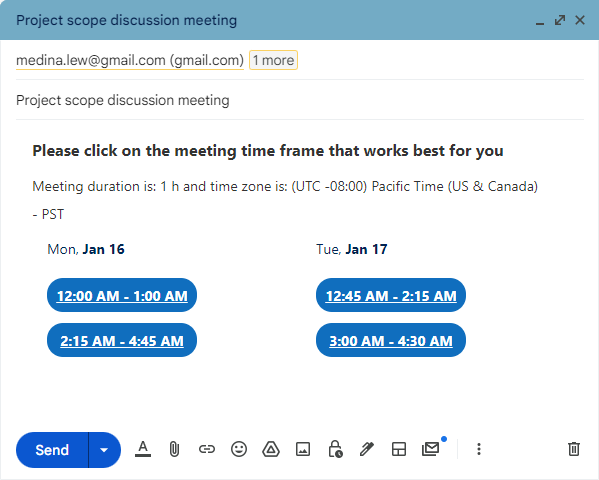
When a recipient opens the invitation link, they can select the time slot by clicking on their preferred date and time. Additionally, recipients can change the time zone for the available time slots using the drop-down list above the list of available time slots.
\booking-ts1.png)
Note
When a recipient clicks on their preferred slot, RG Email Sidebar checks if it is still available in the organizer and in-org required attendees’ calendars. In case it is occupied, RGES suggests recipient to select another slot. Also, the recipient can actualize information about available slots by refreshing the Booking page
After a recipient selects a slot on the Booking page, they will see a Booking confirmation dialog, where they need to click the Book meeting button to finish the booking.
\booking-ts2.png)
As soon as a time slot is selected and booked by the recipient, it gets automatically reserved in the organizer’s and attendees’ calendars, and they will receive a corresponding email notification.
Important
The time slot links are valid for 60 days; they expire after the meeting date/time passes or 60 days after they are generated. A meeting may be scheduled for any date in the future, but the recipients must reserve their preferred time slots within 60 days. This validity period can be adjusted on a request sent to our CSM team
If you send Time Slots to multiple recipients (potential attendees), only one meeting can be booked using them. Once the meeting is booked, the Time Slots links get expired. If other recipients try to book the meeting using the same links, they will see the following notification:
\already-scheduled.png)

We would love to hear from you!