Mass Deployment of the Add-In [MS Exchange 2016, 2019]
For users of the Email Sidebar on:

3 min read
Tip
Besides rolling out the Solution for the end users, it is highly recommended to install the Revenue Grid managed Salesforce app in your Org; it will enable the full scope of RGES features on the Salesforce side Also refer to this article for instructions how to mass deploy the Add-In in Office 365.
Note
Pay attention that starting from June 2022, Microsoft ceased support and updates of the Internet Explorer 11 desktop application on most versions of Windows 10 and encouraged its customers to move to other browsers. Since the MS Outlook 2013 for desktop uses Internet Explorer 11 engine to render embedded add-ins in its interface, it will be impossible to run RG Email Sidebar on this version of MS Outlook. Learn more in this RG article
To mass-deploy RG Email Sidebar Add-In for the entitled users in your org, do the following:
Tip
Also see this Microsoft article for information on mass add-ins deployment
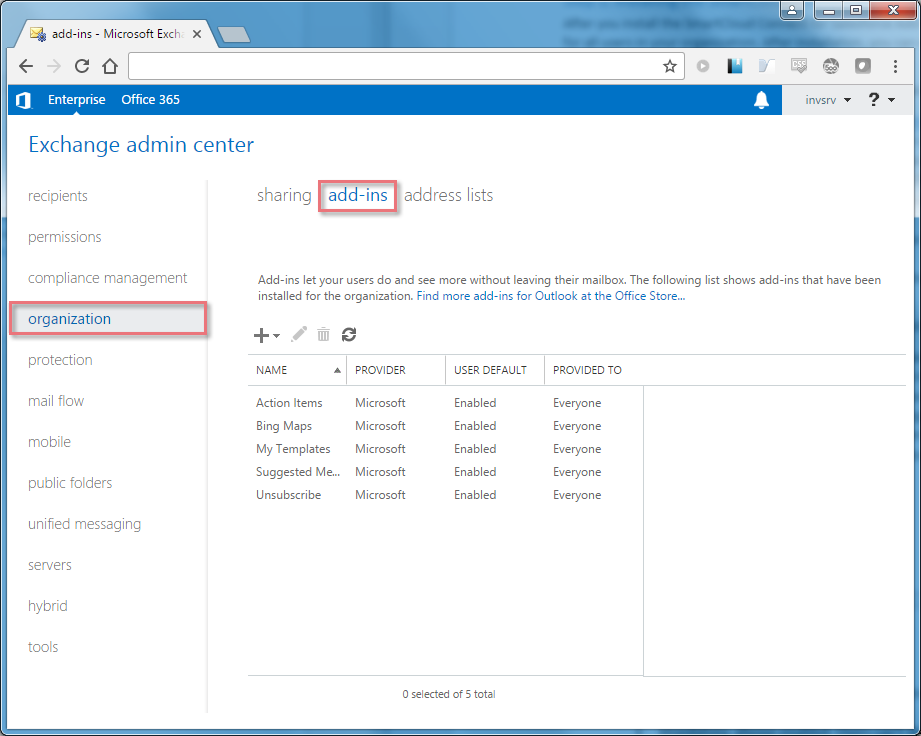
1. Open MS Exchange admin center. Refer to the following articles to find out how to access the Exchange admin center for your organization:
2. In the Exchange admin center, go to Organization > Add-Ins (Exchange 2016 / 2019) or Apps (Exchange 2013)
3. Click the + (Add) button and then choose the source that you want to install RG Email Sidebar from. You can install the Add-In from AppSource or file location:
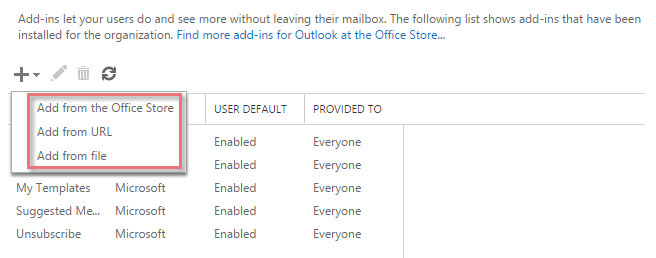
- Add from AppSource. At AppSource, find “RG Email Sidebar for Salesforce” and click Add.
- Add from file. Select Browse, navigate to the location of the RG Email Sidebar for Salesforce manifest file and click Next.
The “RG Email Sidebar for Salesforce” Add-In will appear in the list of available apps.
4. Make RG Email Sidebar for Salesforce available to the users in your organization. To do this, in the list of available add-ins, double-click “RG Email Sidebar for Salesforce.com”. The Edit Add-in settings dialog box will appear.
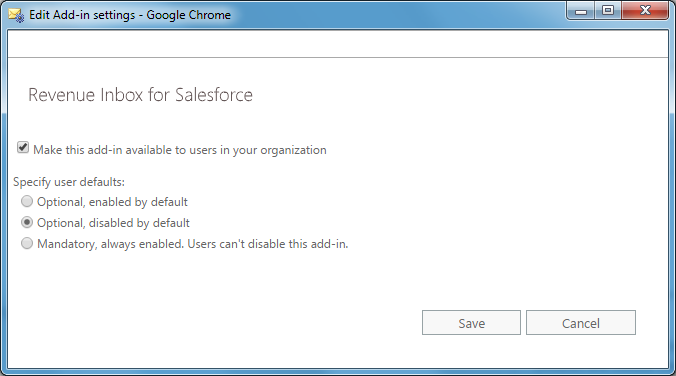
5. To make the Add-In available to all users in your organization, select the Make this app available to users in your organization checkbox and then select one of the following options:
- Optional, enabled by default. Use this setting to have the RGES Add-In enabled by default, allowing the users to disable it if necessary.
- Optional, disabled by default. Use this setting to have the RGES Add-In disabled by default, allowing the users to enable it if necessary.
- Mandatory, always enabled. Users can’t disable this app. Use this setting when you do not want to allow your users to turn off the RGES Add-In.
Click Save.
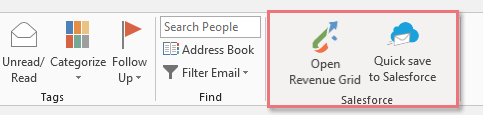
6. To verify that the RGES Add-In was installed successfully for the user, make sure that the Salesforce ribbon group appeared in the Home tab in the user’s MS Outlook.
Setting the Default (Initial) Customization
In the latest RG Email Sidebar updates the default (initial) set of customization settings can be defined by local RG Email Sidebar Admin, to be applied right after the Solution is installed or after customization is reset to default by clicking the Reset to default settings button in Customization page header. This feature enables quick uniform management of settings for different user categories and facilitates restoring product functioning after unwanted adjustments were made in the settings.
Defining Individual Synchronization Settings for a User or a Group of Users
In the latest RG Email Sidebar updates it is possible to push pre-defined synchronization settings to groups of users and individual users within an Org, or to all users of an Org; the users can be allowed or disallowed to adjust these settings. If you need to preset customized sync settings to different users in your Org, send us a corresponding request to our Support team


We would love to hear from you!